Reusable Components

There was a lot of grumbling when Titanium 1.8 came out, and CommonJS was introduced. People had built apps using the best practices of 1.7, but suddenly there were a whole new set of best practices. It took me a bit to get used to the syntax, but once I got over that hurdle, the lightbulb turned on. Coming from a Flex background, it dawned on me that I could finally make my Titanium apps more object-oriented.

I keep seeing code in the Q&A that frankly makes me cringe. The strict-typing in actionscript forced me to use some great best practices, and CommonJS lets us move closer to that style of coding.

I figured that the most common UI element that gets reused in any app is the humble TableViewRow. So, let’s look at my BeerRow module:

The first thing you’ll notice is the retina variable I set once in the module. Like the comment implies, most Ti.Platform calls are expensive, so you should do your best to minimize those calls.

Next, there’s the BeerRow method, which takes a beer object as a constructor parameter, and returns a TableViewRow. The code inside is pretty standard, creating a row, adding a picture and a title. This row is overloaded though, where I add the getter and setter methods pushBeer and pullBeer, respectively. Since the actual ImageView and Label objects won’t be accessible to the outside world, the pushBeer method has to update those for us. Note that the slightly unconventional names are because you can’t add methods that start with “get” or “set” to Titanium proxy objects.

Last, we assign our BeerRow method to module.exports, because, well, that’s how CommonJS modules work. I really like the coding conventions of actionscript, where object classes are UpperCamelCase, and variables are lowerCamelCase, so you’ll notice that my filename and constructor methods are both BeerRow.

So, we have this wonderful row, how do we use it? It’s actually very easy to do:

First, we use require() to include our module. Again, I give my variable the UpperCamelCase so I know it’s the object itself, and not an instance of the object.

Next, I’m looping over my beers array and creating a row for each one. We create an instance of our BeerRow using new BeerRow(beers[i]).

Just after that, I add a click event listener. Inside that event listener, you can see I call my custom getter method, pullBeer, to display the name. Typically, you would probably take that beer object and use it in the constructor of a new window.

I add the row to my array of rows, and then set the TableView’s data to that array. Now you’re playing with code-reuse!

You can find the full source-code for this sample application in my blog-samples project on GitHub.

Comments

Loop labels with Titanium

I recently ran into a situation where I needed to compare values inside two associative arrays. I ended up having to nest two different loops, but wanted to optimize performance by breaking the inner loop when I found what I was looking for. A bit of searching, and I found what I was looking for… Loop Labels. They’re really easy to do and understand, so here’s a simple loop label example, and what the console debug output looks like:

Comments

Mobile App Testing – Picking the right test devices

I figured that it would be great to kick off my new-found motivation to blog with a post going over how I do mobile testing. You have to do testing, it has a high cost of entry, and can be intimidating. Let’s walk through how I do it as a entrepreneur/consultant:

First, let’s establish some basic ideas:

  1. If you’re not testing on-device, you’re not testing. While handy for spot-testing as you code, the iOS Simulator is unrealistically fast, and the Android Emulator is slow, buggy, and difficult to use. Also, some things won’t work or break until you test with a real build, like push notifications or Google Maps API keys.
  2. If you want to test your app on every current iPhone, you currently have 4 devices to test on. If you want to do that for Android, you will want to win the lottery, and rent a warehouse.
  3. Other things are harder to sim/emulate, like available processor & memory on a phone that has real-world usage. There’s a lot more happening on a phone that has active email/calendar/push connections, and has other apps open in the background.

That being said, all is not lost. I’ve formed an effective strategy to maximize my testing coverage. First off, I buy the latest iPhone when it comes out. That’s the easiest decision, since we’re talking one phone per year. Android requires a bit more clever thinking, though.

  1. Buy new Nexus devices. Google actually keeps these phones up to date on reasonable schedules, unlike any other Android phones on the market. If you look at the recent Nexus history, the Nexus One, Nexus S and Galaxy Nexus, I bought the Nexus One, skipped the Nexus S, and bought a Galaxy Nexus. This gave me a “latest & greatest” OS to work on, all the time. I’ll probably skip the next Nexus device, unless there’s some significant deficiency, either on the hardware or software side.
  2. Buy used “carrier” devices. Cracked screen? Big ugly gash in the frame? As long as it’s functional, who cares? Craigslist and eBay are great places to find cheap phones.
  3. Diversify brands and models. I’m sure you have a favorite, but the sad reality is that the manufacturers like to put their big, ugly thumbprints on their phones. HTC Sense, MotoBLUR, and Samsung TouchWiz introduce nuances and bugs that will be unique to their phones.

Personally, I try to buy one phone from each manufacturer for each major version of Android. I try to stick to the most popular model for each, because the odds are in my favor that I’ll have the phone that my client has. If you’re keeping count, that means that each calendar year I plan on buying one new iPhone, one new Nexus, and 3-4 used Android phones.

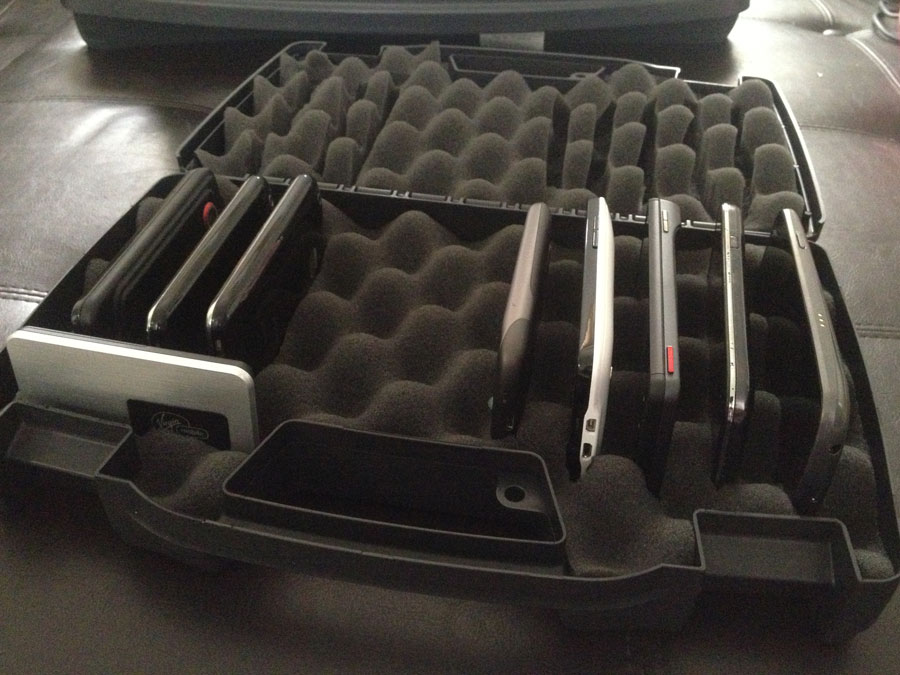
The hidden problem I encountered was that it’s hard to carry around so many phones. I looked for multiple-phone carrying cases, but couldn’t find anything. I eventually figured out that Pistol Cases (Amazon Affiliate link) are perfectly sized to hold a bunch of phones.

Yes officer, that’s my pistol case. No sir, I have it because Android is fragmented and I’m a developer.

I just cut out slots in the foam, and used a bit of spray glue to attach the foam to the case. Cost me $10 at my local sporting goods store, plus the glue. You can see it’s holding 8 phones, a MiFi, and still has room for three more. Luckily, while Android phones might do everything else differently, they all share the same USB/Charing cable. I could carry everything I need in that one little case, at least for the next year or so.

Comments

Moving to GitHub

All of my current open-source projects are now hosted on GitHub. The ability to easily fork projects, along with the whole concept of pull requests, made the move an easy decision.

You can see all the projects at https://github.com/iotashan

Comments

Cross-platform mobile app development

I’m going to set aside a little time each week to blog about my experiences with developing Pintley. This is the first in hopefully a long-running series 🙂

Not long ago, I chose a platform for Pintley Mobile 2.0. I had some specific criteria, and not all of these apply to everyone.

  • Must be a native app-store app
  • Must use native-looking UI controls. An iPhone app needs to look like one, and an Android app needs to not look like an iPhone port. Nobody wants to be using the ported version, and reinventing the UI wheel isn’t for me. If you are trying to make your app hire one of these mobile application development companies.
  • Must perform, even last-gen phones
  • Must support at least iPhone & Android, possibly Blackberry, Palm, Win7

I spoke to an app developer about it and he suggested I looked into writing the app in HTML, and then just putting a “native” wrapper around it. I took a hard look at other apps that do this, and realized two things. First off, the performance just wasn’t quite there. These things responded like web pages, and that just wasn’t what I was looking for. The second problem I realized was that because it was HTML for multiple platforms, I would be facing the same headaches as HTML on the desktop… browser standards compliance & implementation. There are a couple platforms out there, like jQuery Mobile and Sencha Touch, but both platforms are not quite there yet, and would require heavy CSS trickery to “look” like native apps.

I took a look at Flex 4.5 & AIR Mobile, but the UI controls look like Flex controls, not native. Also, there’s no public info on if or when the iPhone Packager will be updated to support Flex 4.5.

Building both the iPhone and Android apps in their native languages and then maintaining both versions was cost-prohibitive.

I eventually settled on Titanium from Appcelerator. This neat little platform lets me build applications in their javascript-based language, which then gets compiled to a native application. It’s similar to how Flex works, in that you write your MXML, which is converted to Actionscript, and then compiled to a SWF. Titanium compiles the .js files to platform-native code (ObjC or Java), and then uses that platform’s SDK to compile to a native app. Yes, that means that there’s an abstracted framework sitting inbetween your code and the final compiled product. Yes, I’m sure that comes at a performance penalty. However, I really didn’t run into any big performance issues. The abstracted framework is there, but remember that framework is written in the platform’s native language.

Titanium’s SDK has been a breeze to pick up. My knowledge of Actionscript/Javascript really comes in handy, and if you’ve done a decent amount of work with jQuery you’ll feel right at home with Titanium. My main complaint is with the documentation… it’s a little inconsistent at times. For example, there are UI components in the main UI namespace (Titanium.UI) that are iPhone-only. Other iPhone-only UI components are in the iPhone namespace (Titanium.UI.iPhone or Titanium.UI.iOS). The documentation also fails to mention that these components are iPhone only… You don’t find out until you build it for Android and it crashes. The Kitchen Sink example project, however, is kept pretty up-to-date, and provides you with real working samples of how to get things accomplished.

Titanium’s IDE is exactly like whatever you currently use to modify javascript…. Mostly because they don’t have their own IDE. I have chosen to use Aptana Studio with an autocomplete header file. There’s also a bundle for TextMate.

The basic process for mobile app development is this:

  1. Install the iOS and/or Android SDK’s, and Titanium
  2. Create a new project, or import their Kitchen Sink Example
  3. Edit the .js code in your IDE of choice
  4. Hit the compile button in the Titanium Desktop application. This compiles the app and installs/runs it on your simulator or device.

The Titanium SDK is free and open-source. I, however, opted for the $200/mo professional option. The main reason is this option gives, among other things, access to their Appcelerator-moderated Helpdesk section, which has a two-business-day turnaround. I’ve easily saved $200 worth of time & headaches with my questions there, and you probably could, too. I don’t know if I’ll maintain the subscription past the launch of Pintley Mobile 2.0, but we’ll see.

So, follow me into my journey into building Pintley Mobile 2.0 for iPhone and Android.

Comments